Pages

Tuesday, April 30, 2013

Websites, Websites, and More Websites!!!!!

There are SO many ways to make your own website, whether it be for a business, charity, or yourself.
Here's a few I've learned:
From Scratch- straight HTML code. Very confusing, ends up pretty simple.
Blogger- versatile and easy to use, though it is perfect for a personal blog it is not the best choice for a more pro-looking professional business or group site.
Weebly - looks very pro, and is easy to use, but can be frustrating because some of the features are for paid members.
Google Pages- have not explored this at all, so I don't know about it's pros or cons.
Microsoft Word- YES!! PLAIN 'OL WORD IS A WEBSITE BUILDING TOOL!!!!

And the third option is what this e-tutorial is about; using Word to it's fullest.
Here's how to do it...

Figure 1
1. Create Word Document. See fig. 1
2. Save it as normal.
3. Click FILE/SAVE AS and drop down the menu. Click "WEB PAGE"
4. go to the save location and right click the document. Click OPEN WITH...and select your web browser. HINT: The folder titled with your documents name and "_files "is not where you will find it.
5. Go back to the word document copy you saved earlier, and make any necessary changes.
6. Umm, there is no step 6. You're done.
 YAY!!!

P.S. a similar thing works with PowerPoint. It will give you an interactive presentation webpage that is very cool.


Wednesday, November 14, 2012

Candyman

here's a demo video of a tech ed project i made. i will post a tutorial soon hopefully :)

The Fate Of IvyBlog

While I was searching up ideas for D.I.Y. christmas gifts,  I was amazed at all the AWESOME D.I.Y. bloggers out there! I was thinking... wouldn't it be cool for IvyBlog to become a project log for everything i'm doing and care about? I mean, I'd focus more on things i've made than trips or experiences. Of course, I'd still do that too- but I think it would be nice if IvyBlog could be a rescource for others to find creative project directions.

just an idea.

School

I know, I know... It's almost the end of term 1 and I haven't done a single post yet about school, one of the biggest changes in my ENTIRE LIFE. yep. If you're curious about the actual SCHOOL, (Summerland Middle) follow  this link to the school website. If asked to describe my experience in 1 word, it would be "WEIRD". Not "AWESOME" not "BAD"... just vveeerrryyy different.

yeah, I  know that was a short and nonintresting post, but i'm very low on inspiration right now.

Monday, November 5, 2012

Halloween

WOW... I haven't posted in FOREVER.
Halloween was great (aka. lots of candy). I was going to be a steampunk but ran out of time so I was a witch. I carved a Jack-O-Lantern, but without a face... it was a glowing orange cupcake. I wasn't able to get a picture of it but here's the photo I copied it from:
 

Tuesday, July 17, 2012

Japanese Birthday party

It's been a long time since my last post!My birthday party this year was a HUGE success- we had so much fun! Lots of inspiration was from a blog we found that had some really cool ideas for a Japanese party.Yes, I'll cut to the chase; here's the photos:
the party area was a mini tea house set up on our back patio.
SSSLLLUUURRRPPP!!


When the girls got here, we each picked a brown paper bag that had been decorated with cute   printables from etsy . Each one had a Kimono inside in a different color that my mom had sewn! (one was purple with gold wavy patterns, one had the same pattern but gold with purple designs, one was blue with silver flowers, and one was silver with blue flowers) Then we put on lip gloss, eye shadow, and toenail polish to help us feel more like Japanese princesses.We also did our hair, and stuck in decorated chopsticks for hair sticks that we made ourselves.While some girls were finishing their hair sticks, others started gluing some cute etsy printouts to the backs of little mirrors to make custom mini mirrors.After we were all dolled (or should i say kokeshied?) up, it was time to start our main activity: kokeshi painting. Kokeshis  are small wooden Japanese dolls with no neck,arms,or legs. Mom got ball knobs and candle cups and dowel caps from Michael's in Kelowna.Here's the finished dolls:
mine's on the far right....we didn't have time to glue on her buns!


we ate supper after that, then watched a Japanese animae movie called spirited away. there was some craziness at supper...
anonymous guest attempts to eat entire blob of wasabi...


there was also chopsticks-stuck-up-nose "walrus tusks" going on.....
we had a great time!

Here's some great photo shoot pics my dad took of us;


Thanks guests, dad, and especially mom for making this fun day possible, and awesome!

lately I've also been doing drama camp so I'll post that soon!

-Ivy


Wednesday, June 6, 2012

This Post Is Made Entirely In HTML!


yep. I'm learning HTML code!
look:
  • I
  • Can
  • Even
  • Make
  • Lists!
Icando
tablestoo!
now, it may not seem amazing that I can make tables,lists or alerts, or that I can change the text color, MAKE LINKS and even make the links change color when you click on it like i did with the last link, but it's WAAAAY harder than it looks, until you inspect it closely. And if i was making this as an html page, I'd have to do even more, like specifying in code where the document starts and ends.

My latest project is a page with a list of cool books I've read.
To see the html for any webpage, just right-click, then click "view source". wow!

Magical Manga

Bubbly, expressive, gorgeous eyes, long long hair, AMAZINGLY detailed costumes, fantastical powers-  What do all these things have in common? They're all a must if you're drawing in the Manga sub genre of Shoujo "Magical Girls". The last two days I've been trying to draw these amazing characters, with (I think) varying degrees of success. Here's a stereotypical Magical Girl from a Google Images search:
I know, amazing. There's a reason I wanna be able to draw like this, you know!
And here's my first attempt:
 well, it's a start. But, to me, it seems that it's sorta stiff. It doesn't have the energy I was hoping for.

I like this one MUCH better, although to be fair I was kind of copying the pose and stuff from a drawing book.

I'm really into this style so I'll keep practicing...  hopefully practice will make perfect prettier!
Please feel free to share your thoughts via Comments.

Monday, June 4, 2012

Red Carpet Gymnastics Event- West Kelowna Gymnastics

This is a movie I made with the videos Mom took of me at the Gymnastics meet in West Kelowna (aka. Westbank, Westside) on Sunday.

Friday, May 25, 2012

Flight cage

Before you get excited (see, grandma? I remembered the c!), no, the flight cage does not mean our butterflies are born.We're just preparing ahead of time, because it's easier to transport the chrysalises to the new cage than the adult butterflies.We constructed the cage out of an unused bed canopy hanging thingy.
the finished flight cage

We just hung it from a windowsill ledge, knotted the bottom, placed a cardboard rectangle inside, on top of the knot, rested the contraption on a little side table,and hung the netting that the chrysalises were suspended from into the top.

Here's more pictures.

the chrysalises and their netting.

a wad of Kleenex in a  large plastic lid will be soaked in sugar water to serve as a butterfly feeder.

the netting hanging inside the cage
A jar of butterfly feeder solution (9 parts water to 1 part white sugar)

a homemade butterfly feeder (i don't think it'll work very well)

since one of the caterpillars had to be put in solitary confinement for trying to disturb/nibble the chrysalises, his chrysalis was not attached to the netting like the others, so we set up this little thing for him.


Friday, May 11, 2012

Butterfly Project

YESSS! Four painted lady caterpillars now reside in Betta's old fish tank (along with many handfuls of grass,a few dandelion heads, and some lilac leaves).
The whole setup is quite nice, including climbing twigs, a shallow water dish,and a little plastic thingy of caterpillar food paste.Our caterpillars are supposed to turn into the kind of butterfly on the left, the Painted Lady, but it could turn out to be an American painted lady.(on the right)


this is how their little "meadow" looks like from the outside:

If you're curious about what stage our little guys are currently in, please check the latest post under the Butterfly Watch tab on this blog. I probably will not get to update it daily, but if i miss a few days and then post, I'll do a post for each day I missed.

Some fun butterfly,insect, and moth facts from http://www.thebutterflysite.com/facts.shtml

Fun Butterfly Facts:

We have gathered some strange butterfly facts to share with you. Amaze your friends! Enjoy!
  1. Butterflies range in size from a tiny 1/8 inch to a huge almost 12 inches.
  2. Butterflies can see red, green, and yellow.
  3. Some people say that when the black bands on the Woolybear caterpillar are wide, a cold winter is coming.
  4. The top butterfly flight speed is 12 miles per hour. Some moths can fly 25 miles per hour!
  5. Monarch butterflies journey from the Great Lakes to the Gulf of Mexico, a distance of about 2,000 miles, and return to the north again in the spring.
  6. Butterflies cannot fly if their body temperature is less than 86 degrees.
  7. Representations of butterflies are seen in Egyptian frescoes at Thebes, which are 3,500 years old.
  8. Antarctica is the only continent on which no Lepidoptera have been found.
  9. There are about 24,000 species of butterflies. The moths are even more numerous: about 140,000 species of them were counted all over the world.
  10. The Brimstone butterfly (Gonepterix rhamni) has the longest lifetime of the adult butterflies: 9-10 months.
  11. Some Case Moth caterpillars (Psychidae) build a case around themselves that they always carry with them. It is made of silk and pieces of plants or soil.
  12. The caterpillars of some Snout Moths (Pyralididae) live in or on water-plants.
  13. The females of some moth species lack wings, all they can do to move is crawl.
  14. The Morgan's Sphinx Moth from Madagascar has a proboscis (tube mouth) that is 12 to 14 inches long to get the nectar from the bottom of a 12 inch deep orchid discovered by Charles Darwin.
  15. Some moths never eat anything as adults because they don't have mouths. They must live on the energy they stored as caterpillars.
  16. Many butterflies can taste with their feet to find out whether the leaf they sit on is good to lay eggs on to be their caterpillars' food or not.
  17. There are more types of insects in one tropical rain forest tree than there are in the entire state of Vermont.
  18. In 1958 Entomologist W.G. Bruce published a list of Arthropod references in the Bible. The most frequently named bugs from the Bible are: Locust: 24, Moth: 11, Grasshopper: 10, Scorpion: 10, Caterpillar: 9, and Bee: 4.
  19. People eat insects – called "Entomophagy"(people eating bugs) – it has been practiced for centuries throughout Africa, Australia, Asia, the Middle East, and North, Central and South America. Why? Because many bugs are both protein-rich and good sources of vitamins, minerals and fats.
  20. YOU can eat bugs! Try the "Eat-A-Bug Cookbook" by David George Gordon , 10 Speed Press. Don’t want to cook them yourself? Go to HotLix for all sorts of insect goodies! My favorites are "Cricket-lickit’s" – a flavored sucker with a real edible cricket inside. (this is an opinion from the collector of these facts, not me, Ivy. I have never even been to the site link here but I've seen those cricket suckers at the Vernon Science Centre and they look cool)
  21. Many insects can carry 50 times their own body weight. This would be like an adult person lifting two heavy cars full of people.
  22. There are over a million described species of insects. Some people estimate there are actually between 15 and 30 million species.
  23. Most insects are beneficial to people because they eat other insects, pollinate crops, are food for other animals, make products we use (like honey and silk) or have medical uses.
  24. Butterflies and insects have their skeletons on the outside of their bodies, called the exoskeleton. This protects the insect and keeps water inside their bodies so they don’t dry out.

NOTE: I did not collect these! If some are inaccurate it is not my fault.

Remember to keep checking Butterfly Watch! I'll have a photo, measurement, and info post for every 2 days but I may not post it on those exact days.

A note to blog readers: remember to check not only the latest post on this site,but some older ones,too that you may not have seen. believe it or not, I sometimes do post cool links,projects,and photos!


Friday, May 4, 2012

E-fun

BORED OF BORING EMAILS?
WANT TO SHOW YOUR FUNKY STYLE?
THIS POST IS FOR YOU!!!!!!

but don't be limited by this. this is only a very beginner course.
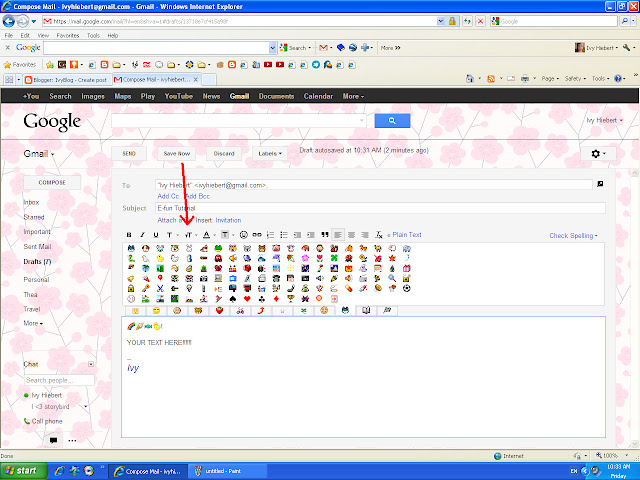
now, let the Gmailing begin! first, launch Gmail then select compose mail!
STEP ONE; EMOTICONS
luckily, Gmail has tons of new emoticons for us to use!Click the happy face as indicated by the red arrow.The panel of emoticons will appear(see "step two; add text". the picture there shows the open panel). click around the bottom tabs of the panel to find more cool emoticons in all different styles.Some are even animated!TIP: substitute emoticons for letter O's like a heart emoticon in place of the o in love.
STEP TWO; ADD TEXT
It'll be easier to edit your text after it is typed in.click the Tt button as shown by the red arrow to open the Size menu.Choose a size for your text TIP: remember to highlight first! TIP: a bigger text size helps people notice your beautiful email!

STEP THREE; FIND-A-FONT
click the T button as shown by the red arrow
 once the fonts selection window comes up,select a font.TIP: be sure to highlight your text first! TIP: Gmail doesn't have many cool fonts. if you wish, type your text into a program with cool lettering, then copy and paste into the email.

STEP FOUR; COLOR ME!
add color to your email!
follow the arrow to the underlined A. ..

...select your color!TIP: remember,highlight the bit of text you want to color before selecting a color!TIP:we recommend making every word or so a different color if it's a short email, and every sentence different for a longer email.

STEP FIVE; A PICTURE IS WORTH A THOUSAND WORDS
remember to add the graphics! Upload a picture file(s) by clicking on the Attach A File button shown by the red circle and arrow


TIP:do you not have any of the right snapshots for the occasion? add clipart and borders anyway.try this for starters:chibi Clipart Google Search


CONGRATULATIONS on completion of the course "Email Fun"
send me a funky email at ivyhiebert@gmail.com and I will email you a certifacate, if you want one.

Some Flower Pictures

well, we went to the ornamental garden.And I took some pictures. Here's my favorites:


 Not to brag, but I think I'm improving my photography!
I kinda like some of these!
P.S.  These make cool desktop backgrounds. Just right click, then select "set as background"

Sunday, April 29, 2012

Square Foot Gardening

Here's an info booklet I made after I went to a gardening workshop.
I don't know if this link will work for you... If you want to see my booklet and this dosen't work, email me at ivyhiebert@gmail.com  and I'll send you the file!
Square Foot Gardening!.wps
1296 kb Download

Wednesday, April 25, 2012

Cake... Finally Done!

We took a lot of pictures of this cake, from all different angles, but this one video shows it all.Of all three cakes in our category (8-11 yrs.),our cake was FIRST PLACE!When I walked into the back room at the cake shop, I didn't know witch category corresponded with which tables, so I waaaaaay lowered my expectations of our chance at winning, while i looked at the three-foot-high, elaborately-animal-printed, gravity-defying, and very-cool-almost-completely-edibly-sculptured top of a cake at the professional category's table. Okay, so I kind of knew that one wasn't going to be in my category, but still, one of the adult ones looked like it might have been and it was sitting right beside some pretty cool ones.

one of the Professional cakes.(!!!)


An undersea cake (an Adult cake).... it was cool to see how someone else did the same theme so diffrently than ours.

ha ha... I love this very original and cool cake. It was, i think, in the Teens section (12-16 year-olds or something)

Overall, the whole experience was AWESOME! Even if we hadn't won I'd be just as proud of our hard work. Though parts were a bit frusturating, I loved the process.If you'd like to see some close-ups of some of the fish and decorations please look at my post "CUUUTTTTEEEEE CAAAAAAAAKKKKKE".


Tuesday, April 17, 2012

101 Creative Smoothies

This is a cooking show-style video series Jessica and I made. this is episode #2, I'll post episode #1 soon.
A BLOOPER I JUST DISCOVERED: the "add three tablespoons of orange juice" clip runs twice. sorry. you only need to add it once but I was too lazy to redo the video... just ignore it the second time it's in there.

Monday, April 16, 2012

CUTE CAAAKE!

My friend Hannah's mom works in a cake/cookie/cupcake decorating shop, phat cat cakes .What does this have to do with my semiweekly blog update? Everything...  Hannah and I are making an undersea-themed
cake for the
...witch is a contest that the shop is putting on. Want a sneak peek at some of the COMPLETELY EDIBLE and COMPLETELY CUTE fondant critters we're making? look no further than this post, and maybe a new section of this blog called PIC OF THE WEEK I'm planning soon (it'll include my fave picture I've taken this week as well as my fave picture some one's sent in).
my little purple octopus. it was soooooo hard to smooth her head on...

a mama starfish with her baby- these are made of 2 star cutouts stuck together with scrap fondant in between

I LOVE this little guy! I never would have thought a sea urchin could be this cute...but Hannah did, and it looks great! 

my Manta Ray. or maybe it's a Sting Ray. Naomi had the awesome idea of using two different-sized eyes for this super easy-to-make critter.

HAHAHAHAHAHAHAHA..... this most comical attempt at a puffer fish was made by me.

this clam that Hannah made looks great even without it's "pearl"- the pearl will be one of those big silver ball candies.

the blue mermaid on the left is mine, the green one's Hannah's. we thought it would be cute to make little mermaid versions of ourselves and they turned out quite well as you can see! The hair was the most frustrating part for me, and my favorite is their tiny little belly buttons!

some corals we made for fillers.


some little fillers including some tiny fish, baby starfish,(or are they sea flowers?) a shell, and seaweed in varying shades of green.

these sea turtles will look even cuter once they are assembled.
I was frustrated often with almost every cake topper- but i feel very proud about the result! Overall, I'm loving the process, having a project, seeing our sketches and ideas become real, and learning to accept and get excited about new ideas.

Thank you so much to Naomi for letting us use her fancy fondant,edible glitter dust, and cake bases. Our cake would look so much sloppier without her professional,warm,essential mentoring and advice. Also thank you to Hannah for being a great friend and project partner.

Monday, April 9, 2012

Take you to Rio

http://

recent creative projects

Spring... finally. I've been doing lots and lots of cool crafts this month,including:

+ Storybird- an online book-making site.you choose an illustrator, then use their uploaded art to make a book.then you can buy it as an Ebook for iPad, iPhone,and more,or as a soft- or hard-cover book.check my most recent one out now for free online at http://storybird.com/books/the-girl-encyclopedia-how-not-to-get-bored/?token=6pnxsh . Or start your own at http://storybird.com/.


+Tye-dyeing Kleenex.With a kids watercolor paint set.
All I had to do was place one tissue on top of another, then pour lots of water on to the paint set, and dip a twisted-up area of the layered Kleenexes into the paint. then I did that more times till the whole thing was colorful. Pictures 1 and 4 (starting at the top and going clockwise) are made with the same method,but after being dyed were crumpled, squeezed, unfurled,re-dyed, and crumpled,squeezed and unfurled again, like the new wings of an emerging butterfly.


+Sewing and embroidery.
feast your eyes on these adorable little felt foods:
Fried Egg
Cherries

Blueberry
 They were quite frustrating at times but I'm so happy with the end result!Sewing is something I'd love to get better at someday, and making my own designs is so fun!

+ Card Making
I made a very fancy Easter card for my grandparents (who set up a wonderful, challenging and very fun egg hunt and cooked up a delicious Easter dinner) complete with a Manga-style bunny girl with card stock ears sticking out the top of the card, a drawn Easter basket containing two tiny envelopes containing "Happy Easter" messages and slits in witch to insert little double-sided paper eggs.I had so much fun making it and put a lot of effort into it... but then left it out in the sun room, and it got wet.The colors bled- it was all marker except the Bunny-Girl on the front that I was so proud of (good thing that was done in colored pencils) it was still okay- looking, but still disappointing...


+ Gymnastics
I also have made up a nice gymnastics routine to "Take You to Rio" (http://youtu.be/-z3_BKIUEow). I had just watched the movie Rio so was excited about that at the time. I might add that video as a YouTube gadget on the blog, cause I really like it. While we were up at Apex at a friend's cabin, Ella, Vanessa, Cassandra, and I made a 4-person routine to another song from that movie, "Hot Wings"(http://youtu.be/Iuy5YsZGK3c. ) I'm really proud of myself for LEARNING A FRONT WALKOVER!!!!!! Okay, I'm not that good yet but once in a while they're pretty nice..